Intro
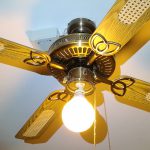
I have some ceiling fans at home, and when it’s not too hot they perform very well in giving some relief. But I don’t like very much standing-up when some control is needed, that’s why I decided that a remote was needed. Buy one ? Hmm, they sell for low price, but they are too simple. So I decided to design and build my own fan-control in a way that some simple automation was possible. For simple automation I mean that the fan will automatically switch off after a predetermined amount of time, and when switched on the behaviour depends on temperature (see below for further details).
I ended adding ESP8266s to all of the ceiling fans at home.
Each ESP handles both the light and the fan; control is via IR remote or WiFi (through an html page).
-
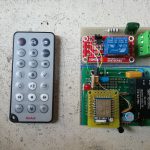
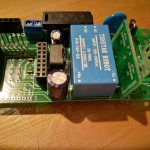
- relay version
-
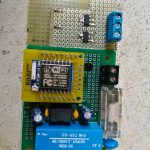
- ACS version
-
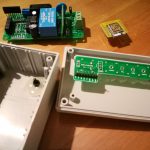
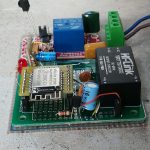
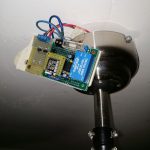
- Assembly
-
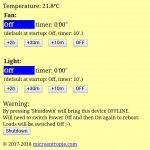
- Main control page
-
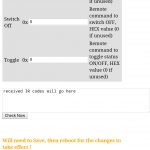
- IR codes capture (thanks to AJAX)
-
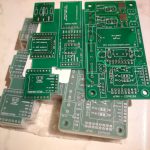
- pcbs of an intermediate version

Yes I know, a simple sOnOff with 2 outputs does nearly the same and is cheaper, but I love to build things … and I don’t like to be Internet dependent for a simple on/off switch (a TCP packet sent over a server to ‘who knows where’). I want the system to be fully functional even without any kind of connection. In this project WiFi is welcomed but an IR remote can be enough. Implementing an MQTT server is not a straightforward operation, that’s why I opted for http.
A web server and an http interface built into the Esp allows for full configuration.
WiFi and or IR can be disabled if not required.
The controller has an on-board temperature sensor, allowing a simple (IF THEN ELSE) automatic behaviour change; example: in winter time the fan is not required and switching the controller on, has only effect on the light. This is particularly handy if a single switch gives power to the whole light and fan unit.
I mean that the fan (and controller) is normally powered off. When it is switched on (by the light switch on the wall) the temperature is read-in and based on how it has been configured the light and / or the fan switches on or not..
Another possible application (allowed by the firmware) is that in winter the fan will be switched on for only 10 minutes, this is useful when cleaning the floor with water and a rag, to get a shorter evaporation time.
The main http control page is reponsive by making use of AJAX, and the IR configuration page too makes use of AJAX for an easy IR remote configuration (you press the button on the Remote and see the corresponding code directly on the configuration http page), so you can set the code immediately WITHOUT the need for a second Arduino test unit connected to a PC serial port.
Schematic and full source code is provided at my Github repository:
https://github.com/microentropie/cFan/tree/master/v1/hw
Schematic
I made 2 versions, one where the outputs drive relays, the other drives ACSs.
Even if there is an insulation power transformer, the ACS version is directly tied to the mains !
Principle is really simple, the relay or the ACS is switched on or off when the relative command is received via WiFi or IR.
Software
The ESP8266 has enough space for running the inputs, outputs, timers, a web server, soft-AP, firmware update via the web, NTP client, IR receiver and decoder. All glued together by the Arduino libraries.
Software has been split in different sources to ease reuse (in this project I re-used most of the software from my rice-cooking machine).
The first time it is run it starts as WiFi AP, and by connecting to it everything can be configured. Details, including the AP ssid, username and password are exactly the same as my cooking machine (http://192.168.44.1/config, default password 12345678, firmware update at http://192.168.44.1/update, …).
Considerations
The IR remote option is critical: the transmitter should be directly visible to receiver, at a distance of a few meters and fan blades (if turning) are an obstacle. Finally buying a cheap remote (there are kits for Arduino) is not a good option: reliable covered distance is 2-3 meters but only if perfectly aligned. In other words dont make my same mistake: ir receiver you see in photos has too many obstacles.
For practical reasons (and for learning something new), I made some of the html pages web responsive by using AJAX. The reason is that the ESP8266 is not a powerful CPU with a lot of memory: continuously calling the web server (every 10″) is not the best thing that can be done.
As an example, the non-responsive version of the main page had html, css and ajax all embedded in the same page; this was meaning that approximatively 3 KByte where moved from the ESP to the web browser every few seconds. The micro was not very happy of this, considering it has to handle other tasks too. Luckily in the last few months guys at the ESP Arduino libraries have added an option where the sketch can now be compiled with “lwIP variant: higher bandwidth” and this solved most of the problems. Anyway by making the web pages responsive reduced the amount for data from 3 KByte every 10″ to 51 bytes every 10″ :-).
Another good reason for using Ajax is in the IR remote configurator: every single code coming from the remote is transformed to a unique 64 bit number by the decoding libraries.
This means that I can press the button on the remote and instantly (after 0-10″) see its code. So I can copy the code and paste it in the field that will perform the action (on or off or toggle).
The old way is to prepare an arduino, IR receiver, connect to the PC and look at the serial port to get the 64 bit code, the copy it to the fan configurator.
Why AJAX instead of jQuery ? Well the ESP8266 is a small micro, jQuery add approximatively 400 KByte of overload and even if the libreries can be referred to another server (CDN), I wanted this project be able to work stand-alone: without the internet it starts as an AP and can be configured by connecting to it. The approach is the same as for the rice-cooking machine, so can go there for details.
If using an ESP32 jQuery would have been the best choice.